This guide helps you to install s3cmd, configure it to connect to CloudPe S3, and perform common operations like listing, uploading, and downloading objects.
Prerequisites
- A Linux VM (e.g., Ubuntu)
- Access Key and Secret Key generated from CloudPe S3
- Your target bucket name
- Basic knowledge of command-line operations
Understanding CloudPe S3 Access Control
- Two access modes:
- Public or private bucket visibility
- Access via full-permission keys (Access Key + Secret Key)
- Keys created in CloudPe S3 work only within CloudPe S3.
How to Create Access and Secret Key in CloudPe
To access CloudPe S3 buckets securely, you’ll need to generate an Access Key and Secret Key. Here’s how:
- Log in to the CloudPe Dashboard.
- Navigate to Object Storage.
- Click on the Access tab.
- You will see fields like Region, User ID, Accounts, and Status. Click on it.
- Click on Create First Key (or “Create Key” if one already exists).
- You will receive your Access Key and Secret Key (Note: Copy and save the Secret Key as it is shown only once).
Note: Keep your secret key secure. It provides full access to your S3 resources.
Installing s3cmd on Your Linux VM
Run the following commands to install s3cmd:
# sudo apt update
# sudo apt install s3cmd -y
Verify installation:
# s3cmd --version

Configuring s3cmd for CloudPe S3
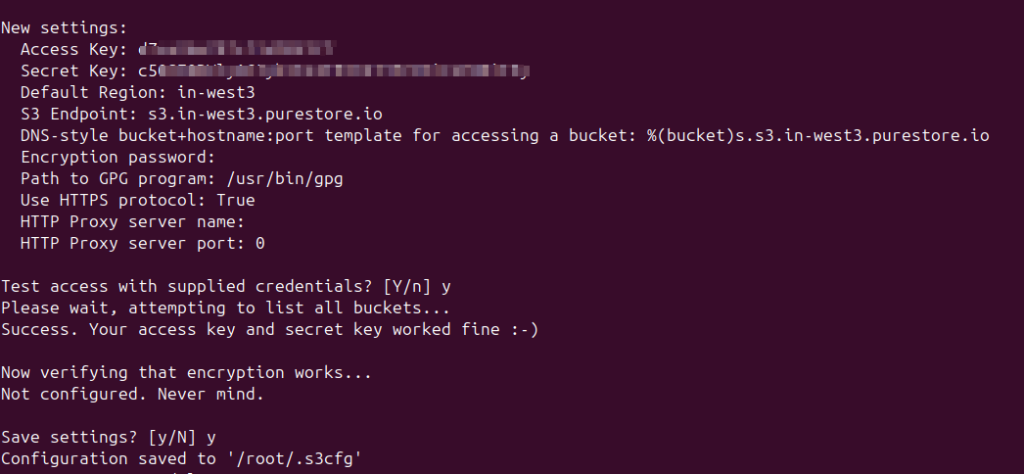
Run the configuration wizard:
# s3cmd --configure
Fill in the following details when prompted:
| Prompt | Value |
|---|---|
| Access Key | <Your-Access-Key> |
| Secret Key | <Your-Secret-Key> |
| Default Region | in-west3 |
| S3 Endpoint | s3.in-west3.purestore.io |
| DNS-style bucket+hostname:port template | s3.in-west3.purestore.io |
| Encryption password | (Optional or leave blank) |
| Path to GPG program | /usr/bin/gpg |
| Use HTTPS protocol | yes |
| HTTP Proxy server name | (Leave blank unless required) |
| HTTP Proxy server port | 0 |
Validating the Setup
Run to test bucket access:
# s3cmd ls
Common Operations Using s3cmd
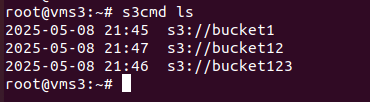
List Buckets
# s3cmd ls
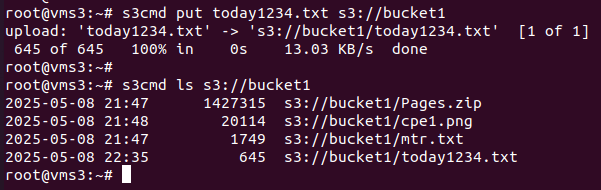
List Objects in a Bucket
# s3cmd ls s3://bucket1

Upload a File
# s3cmd put <filename> s3://your-bucket-name
e.g. s3cmd put today1234.txt s3://bucket1
Download a File
# s3cmd get s3://your-bucket-name/myfile.txt
e.g. s3cmd get s3://bucket1/mtr.txt

Mount CloudPe S3 as a Filesystem with s3fs
# sudo apt install s3fs -y
# echo ACCESS_KEY:SECRET_KEY > ~/.passwd-s3fs
# chmod 600 ~/.passwd-s3fs
# s3fs your-bucket-name /mnt/cloudpe-s3 -o url=https://s3.in-west3.purestore.io -o use_path_request_style
Note:
- Make sure the
/mnt/cloudpe-s3directory exists before mounting. - For persistent mounts, consider adding an entry in
/etc/fstab(with proper credentials handling).
1. Verify the Mount
Check if the bucket is mounted correctly:
# mount | grep s3fs
2. Access Files Like a Normal Folder
You can now read/write files to the mounted S3 bucket just like a local directory:
Upload (Copy) a File to the Bucket
# cp /path/to/localfile.txt /mnt/cloudpe-s3/
Download (Copy) a File from the Bucket
# cp /mnt/cloudpe-s3/file.txt ~/Downloads/
Create a New File
# echo "Hello CloudPe" > /mnt/cloudpe-s3/hello.txt
Delete a File
# rm /mnt/cloudpe-s3/hello.txt
3. Unmount the Bucket
When you’re done:
# fusermount -u /mnt/cloudpe-s3
If fusermount is not available, try:
# umount /mnt/cloudpe-s3