📘 What is LVM?
LVM (Logical Volume Manager) is a flexible and powerful disk management system in Linux that allows administrators to manage disk space more efficiently. It allows you to:
- Create flexible disk partitions
- Resize storage volumes dynamically
- Combine multiple physical disks into a single logical volume
- Take snapshots of filesystems
- Manage disk storage more efficiently in enterprise and cloud environments
❓ Why Use LVM?
LVM is particularly useful for:
- Dynamic resizing: You can extend or shrink volumes without unmounting.
- Snapshots: Create snapshots before major changes or upgrades.
- Volume grouping: Combine multiple physical disks into a single logical storage pool.
- Better utilization: Allocate storage as needed instead of pre-defining fixed sizes.
🧪 Prerequisites
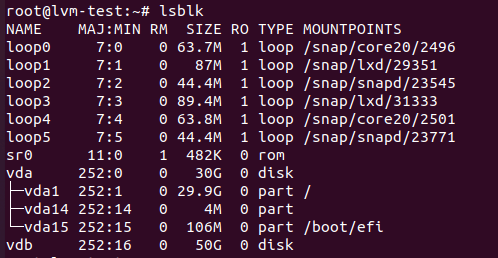
- You must have root/sudo access.
- A spare disk (in this case, /dev/vdb) without any existing partition.
- Use lsblk to confirm the available disk:
# lsblk
🛠️ Steps to Create LVM
1. Create a Partition on the New Disk
We will create multiple primary partitions on /dev/vdb (e.g., /dev/vdb1, /dev/vdb2, etc.) and mark each as LVM-compatible.
Note: You can create up to 4 primary partitions on an MBR-partitioned disk. For more than 4, you would need to create extended/logical partitions or use GPT partitioning with parted.
You can use fdisk for MBR or parted for GPT partitioning.
🔹Command to Start MBR Partitioning:
# fdisk /dev/vdb --For MBR Partitioning
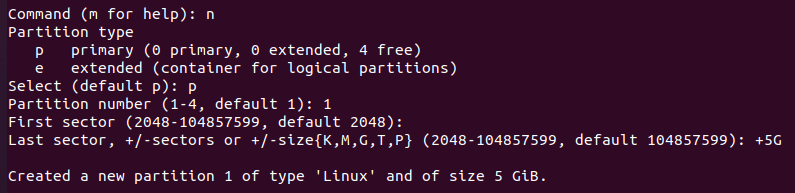
🔹Create First Partition (/dev/vdb1)
- Type n and press Enter (to create a new partition)
- Select p for primary partition
- Choose 1 for partition number
- Press Enter to accept the default first sector
- For the last sector, type +5G (to create a 5GB partition)
Repeat these steps for additional partitions (e.g., +10G, +15G, +20 etc.).
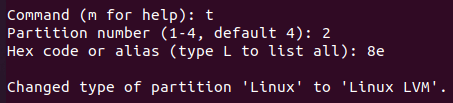
🔹Change Partition Type to LVM (Code: 8e)
After creating each partition, change its type:
- Type ” t “ and press Enter
- Enter the partition number (e.g., 1,2,3 etc)
- Type 8e (LVM partition type) and press Enter
Repeat t for each new partition. And mention the Partition Number to change the Partition Type of each Partition.
🔹Confirm Partitions
Type ” p “ to confirm the Partitions.
Example output:

🔹Write changes and exit.
Type ” w “ and this writes the partition table to the disk and exits fdisk. Means changes won’t take effect until you write them (w).
🔹Reload Partition Table (if required)
Sometimes, the kernel doesn’t automatically reread the partition table. Use:
# partprobe /dev/vdb
Or reboot the system.
🔹Verify the Partitions
# lsblk
Output:
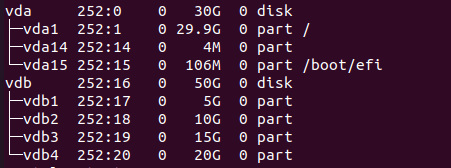
Now the disk is partitioned and ready for LVM setup!
To Perform GPT Partitioning (click)
Using GPT (GUID Partition Table) with LVM enables support for disks larger than 2TB and more than four primary partitions — making it suitable for modern systems.
Step-by-Step Guide:
🔹Identify the Disk
# lsblk
🔹Wipe the Disk (Optional but recommended)
# wipefs -a /dev/sdb
🔹Initialize the Disk with GPT
# parted /dev/sdb
Inside the parted prompt:
# mklabel gpt
🔹Create 4 Primary Partitions for LVM
# mkpart primary ext4 1MiB 512MiB
# mkpart primary ext4 512MiB 1GiB
# mkpart primary ext4 1GiB 2GiB
# mkpart primary ext4 2GiB 100%
This creates 4 partitions:
- Partition 1: 1MiB to 512MiB
- Partition 2: 512MiB to 1GiB
- Partition 3: 1GiB to 2GiB
- Partition 4: 2GiB to end of disk
🔹Set LVM Flag on All Partitions
# set 1 lvm on
# set 2 lvm on
# set 3 lvm on
# set 4 lvm on
🔹Exit the parted prompt:
# quit
The LVM commands and process after partitioning stay the same. So follow the next steps as it is.
2. Create Physical Volumes (PVs)
Once the disk partitions are created, the next step is to initialize them as Physical Volumes (PVs), which are the foundational building blocks of LVM.
Convert all partitions to physical volumes for LVM:
# pvcreate /dev/vdb1 /dev/vdb2 /dev/vdb3 /dev/vdb4
After initializing the partitions, verify that the physical volumes have been successfully created using:
# pvs
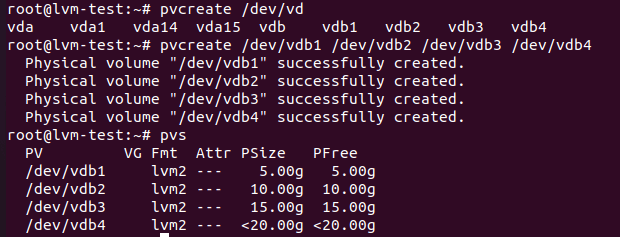
This command displays a summary of all available physical volumes, including their size and associated volume group (if any).
3. Create a Volume Group (VG)
After initializing the physical volumes, the next step is to combine them into a Volume Group (VG). A volume group pools together multiple physical volumes into a single storage unit, allowing flexible allocation of logical volumes from the combined space.
Here, we can create a volume group and named it as “vg_data” using the previously created physical volumes, run:
# vgcreate vg_data /dev/vdb1 /dev/vdb2 /dev/vdb3 /dev/vdb4
Verify the creation of the volume group with:
# vgs

It shows a summary of all volume groups, including their size, number of physical volumes, and available space.
4. Create Logical Volumes (LVs)
With the volume group (vg_data) created, you can now carve out Logical Volumes (LVs) from it. Logical volumes act like partitions but with added flexibility, allowing you to resize or move them more easily compared to traditional partitions.
Below we have created two logical volumes named lv_main and lv_logs with sizes of 10 GB and 5 GB respectively, use:
# lvcreate  -L  10G  -n  lv_main  vg_data
# lvcreate  -L  5G  -n  lv_logs  vg_data
To verify the logical volumes have been created successfully, run:
# lvs
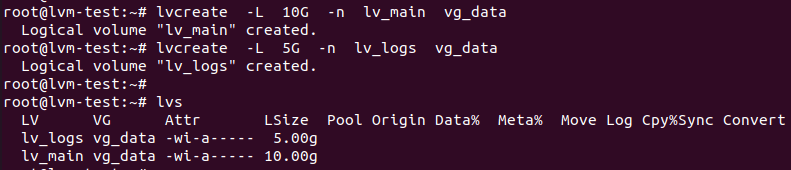
So this displays information about the logical volumes, including their size, name, and associated volume group.
5. Format the Logical Volumes
Before using the logical volumes to store data, they need to be formatted with a filesystem. This process creates the necessary structure to organize and manage files. The ext4 filesystem is a widely used and reliable choice on Linux systems, offering good performance and compatibility.
# mkfs.ext4 /dev/vg_data/lv_main
# mkfs.ext4 /dev/vg_data/lv_logs
Other Filesystem Options:
Depending on your use case, you can choose other filesystems as well:
XFS – High-performance journaling filesystem, ideal for large files and high-throughput environments.
ext3 – Older but still used in legacy systems.
6. Mount the Logical Volumes
After formatting the logical volumes with a filesystem, the next step is to mount them so they can be accessed and used like regular directories. Mounting connects the logical volumes to specific directories in the Linux filesystem hierarchy.
First, create the mount points:
# mkdir /mnt/lv_main /mnt/lv_logs
Then, mount the logical volumes to the respective directories:
# mount /dev/vg_data/lv_main /mnt/lv_main
# mount /dev/vg_data/lv_logs /mnt/lv_logs
After mounting, you can start storing files and data within /mnt/lv_main and /mnt/lv_logs.
7. Add to /etc/fstab
By default, mounted volumes are not persistent across system reboots. To ensure the logical volumes are automatically mounted at boot, you need to add them to the /etc/fstab file — the configuration file that defines mount points for all storage devices.
# echo '/dev/vg_data/lv_main /mnt/lv_main ext4 defaults 0 2' >> / etc/fstab
# echo '/dev/vg_data/lv_logs /mnt/lv_logs ext4 defaults 0 2' >> /etc/fstab
These entries specify:
- The device to mount (/dev/vg_data/lv_main, etc.)
- The mount point (/mnt/lv_main, etc.)
- Filesystem type (ext4)
- Mount options (defaults)
- Dump and fsck options (0 2)
Tip: Always back up your /etc/fstab file and verify syntax with mount -a to avoid boot issues.
How to Increase Logical Volume in LVM
Sometimes, your logical volumes may run out of space. Instead of starting from scratch, LVM allows you to easily extend an existing logical volume and its filesystem. Here’s how:
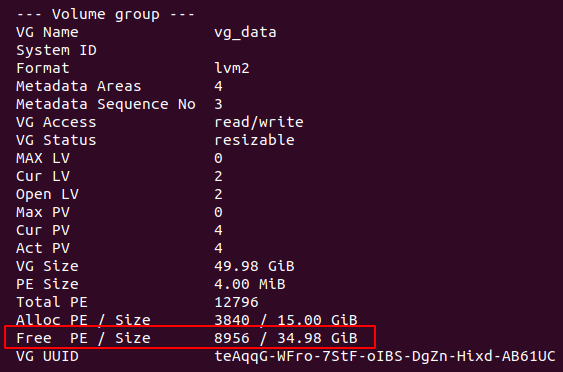
1. Check current LV and VG free space
Before extending a logical volume, you need to check if there’s available space in the Volume Group (VG).
Run the following commands:
# lvdisplay
# vgdisplay
Look for the Free PE / Size field in the vgdisplay output. This shows how much unallocated space remains in the VG. If no space is available, you’ll need to add a new physical volume to the VG first.
Free PE / Size
2. Extend the Logical Volume
If the VG has free space, you can extend the logical volume using lvextend. You can either add a specific amount or use all available space:
🔹To extend by 2 GB:
# lvextend -L +2G /dev/vg_data/lv_main
🔹To use all free space in the volume group:
# lvextend -l +100%FREE /dev/vg_data/lv_main
This increases the logical volume size, but the filesystem still needs to be resized to take advantage of the new space.
3. Resize the Filesystem
After extending the LV, resize the filesystem to match the new size:
🔹If using ext4:
# resize2fs /dev/vg_data/lv_main
🔹If using xfs:
# xfs_growfs /dev/vg_data/lv_main
Note: Make sure the logical volume is mounted when using xfs_growfs, and unmounted for resize2fs unless you’re sure it’s safe to resize online.
Conclusion
- You’ve successfully created:
- Multiple partitions on /dev/vdb
- Initialized them as LVM physical volumes
- Combined them into a volume group
- Created and mounted logical volumes
This provides flexibility, resilience, and scalability for your storage setup.