1. Purpose
Standard Operating Procedure (SOP) for
2. Prerequisites
Before proceeding with the installation of OpenStack CLI clients, ensure the following:
- You have access to an OpenStack environment.
- You are working on a system with administrative privileges.
- Python 3.x is installed on the machine.
- A functional Internet connection is required to download the necessary packages.
3. Installation Overview
The OpenStack CLI tools can be installed on a Linux-based system using either `pip`
(Python’s package manager) or through a Linux package manager (such as `apt` for
Ubuntu or `yum` for CentOS). You will also need to configure the environment with the
appropriate authentication credentials to interact with OpenStack services.
4. Steps for Installation
4.1. Installing Dependencies
The following steps will guide you through installing the dependencies required by OpenStack
CLI.
For Ubuntu/Debian:
sudo apt update
sudo apt install python3-pip python3-dev python3-venv
For CentOS/RHEL:
sudo yum install python3-pip python3-devel
4.2. Installing OpenStack CLI Clients
OpenStack CLI tools can be installed using `pip`. It’s recommended to use a virtual
environment to avoid conflicts with other Python packages.
4.2.1. Installing OpenStack Client Using pip
1. Install the `python-openstackclient` package:
pip install python-openstackclient
4.2.2. Verifying the Installation
After the installation is complete, verify the OpenStack CLI tool by running:openstack --version
This should output the installed version of the OpenStack client.
5. Configuring OpenStack CLI
5.1. Source OpenStack RC File
Once the OpenStack CLI is installed, you must configure it to interact with your OpenStack
environment by sourcing the OpenStack RC file. This file contains authentication
credentials for OpenStack services.
1. Download the OpenStack RC file (this file contains your credentials).
– This file can be obtained from the OpenStack Dashboard under **Project > API Access >Standard Operating Procedure (SOP) for
Download OpenStack RC File**.
2. Source the RC file to set environment variables that are required by OpenStack CLI:
source /path/to/openstack_rc_file.sh
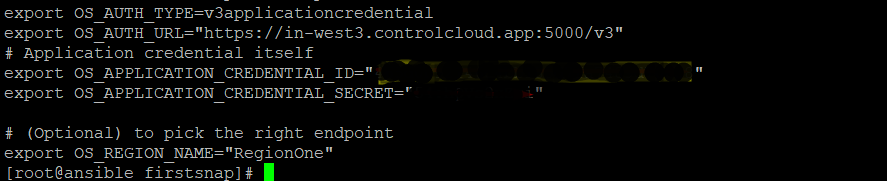
Sample sh file update the app id and secret:-
export OS_AUTH_TYPE=v3applicationcredential
export OS_AUTH_URL=”https://in-west3.controlcloud.app:5000/v3″
# Application credential itself
export OS_APPLICATION_CREDENTIAL_ID=””
export OS_APPLICATION_CREDENTIAL_SECRET=””
# (Optional) to pick the right endpoint
export OS_REGION_NAME=”RegionOne”
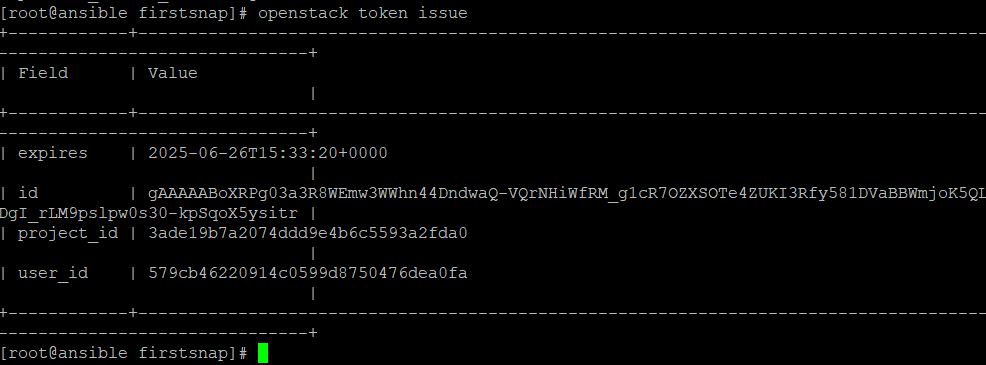
5.2. Verifying the Configuration
To verify that the OpenStack CLI is configured correctly, run the following command:OpenStack token issue
This command should return an authentication token, confirming that you are authenticated and can interact with OpenStack services.
6. Using OpenStack CLI
6.1. Common OpenStack CLI Commands
Here are some commonly used OpenStack CLI commands:
– List available servers:openstack server list
– Create a new server:openstack server create --image <image_id> --flavor <flavor_id> --network <network_id> <server_name>
– List networks:openstack network list
– Create a new network:openstack network create <network_name>
openstack volume create --size 10 <volume_name>
7. Troubleshooting
If you encounter any issues, consider the following common troubleshooting steps:
– Issue: OpenStack CLI command returns an error like `Authentication failed`.
Solution: Ensure that the RC file was sourced correctly and that your credentials are correct.
– Issue: Command not found.
Solution: Ensure that the OpenStack CLI tools were installed correctly using `pip`. If needed, try reinstalling them.
8. Conclusion
This SOP outlines the steps to install and configure the OpenStack CLI, enabling you to interact with OpenStack services from the command line. Always ensure that you have sourced the correct RC file for the project you are working on and verify your environment is correctly set up.
For more information, refer to the official OpenStack documentation.