If you are building or running any application at scale, you will run into Kubernetes deployments. Understanding what a deployment in Kubernetes is, how it works, and which strategy fits your situation is not optional knowledge anymore.
This blog covers the fundamentals clearly and practically. It also walks you through exactly how to set up a managed Kubernetes cluster on CloudPe and run your first deployment, step by step, so you can go from reading to running in under an hour.
TL;DR
- A Kubernetes Deployment manages how your application runs inside a cluster. It handles pod creation, scaling, updates, and rollbacks automatically.
- There are four main strategies: Rolling Update (default, zero downtime), Recreate (brief downtime, no version overlap), Blue/Green (instant rollback, higher cost), and Canary (gradual rollout, most control).
- If you do not want to manage the control plane yourself, CloudPe’s managed Kubernetes runs it for you. Cluster management is free. Setup takes under 20 minutes. 15-day free trial, no credit card required.
What is a deployment in Kubernetes?
A Kubernetes Deployment is an instruction set that tells your cluster how to run your application. You specify which container image to use, how many copies to run, and how to handle updates. Kubernetes does the rest and keeps it that way.
Deployments do not manage pods directly. They sit above a layer called a ReplicaSet, which in turn manages the individual pods.
| Object | What it does |
| Pod | The smallest unit. Runs one or more containers. |
| ReplicaSet | Ensures the right number of pods are always running. |
| Deployment | Manages the ReplicaSet. Controls rollouts, rollbacks, and scaling. |
Think of the Deployment as the manager. The ReplicaSet is the supervisor. The pods are the workers.
How a Kubernetes deployment works
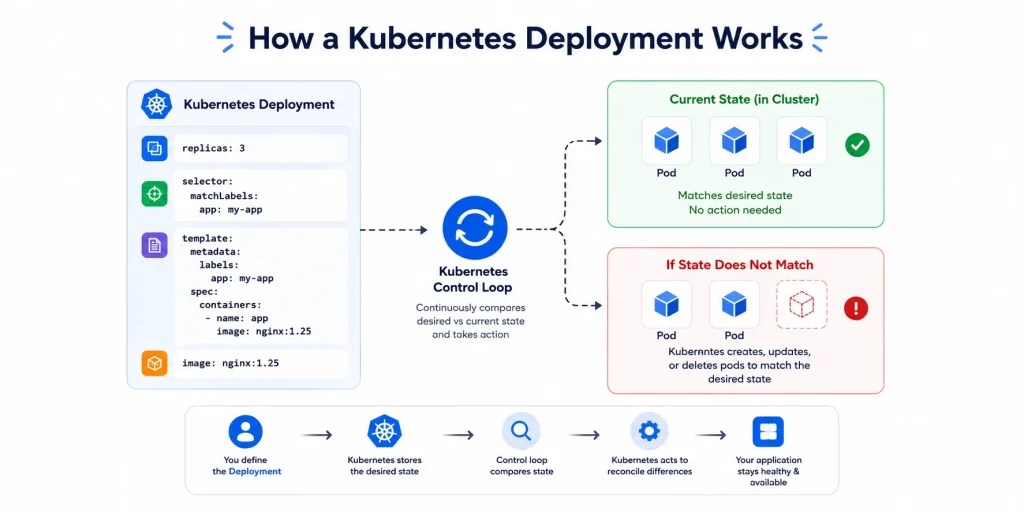
A Kubernetes deployment works by continuously comparing what is running to what you specified. When they do not match, it corrects the difference automatically.
The desired state model
Kubernetes operates on a simple principle. You describe what you want, and it works to match reality to that description.
If a pod crashes, Kubernetes replaces it. If a node goes down, Kubernetes moves the pods to a healthy node. You do not have to step in. The system corrects itself.
This is called the desired state model. A Deployment is how you tell Kubernetes what that state should be.
Anatomy of a deployment YAML
Deployments are written in YAML files. Here is a standard example:
apiVersion: apps/v1
kind: Deployment
metadata:
  name: web-app-deployment     # Name of this deployment
  labels:
    app: web-server
spec:
  replicas: 3                  # Run 3 copies of this pod
  selector:
    matchLabels:
      app: web-server          # Targets pods with this label
  template:
    metadata:
      labels:
        app: web-server
    spec:
      containers:
      - name: nginx-container
        image: nginx:1.25      # Container image and version
        ports:
        - containerPort: 80
The four fields you need to understand first:
- replicas — how many pod copies to run at once
- selector — how the Deployment identifies which pods it owns
- template — the blueprint for each pod it creates
- image — the container image your application runs from
Types of Kubernetes deployment strategies
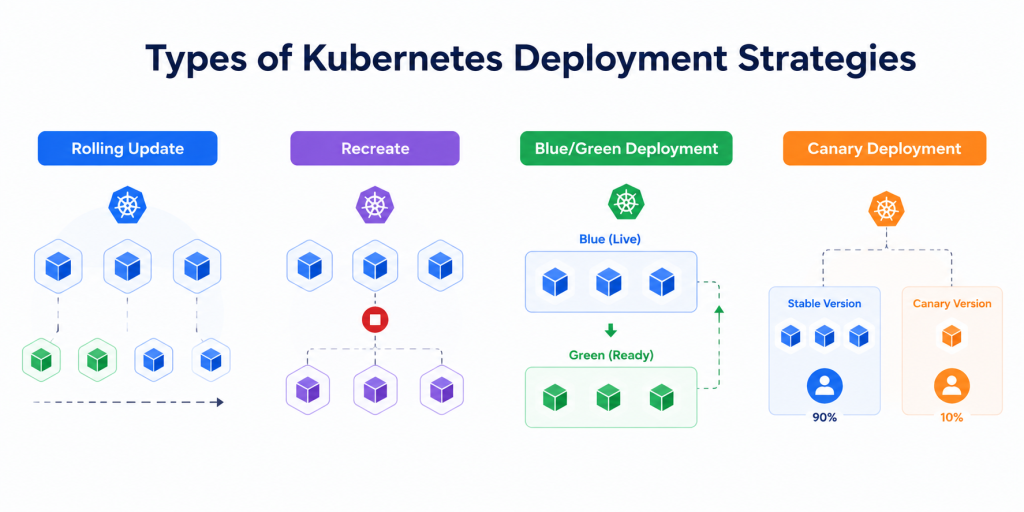
The strategy you pick decides how Kubernetes handles updates to your application. There are four main options.
Rolling update
This is the default. Kubernetes swaps old pods for new ones a few at a time. Your application stays online throughout the update.
Two parameters control the pace:
- maxSurge — how many extra pods can be created above your target count during the update
- maxUnavailable — how many pods can be offline at once during the update
Best for: production applications where downtime is not acceptable.
Recreate
Kubernetes stops all existing pods first. Then it starts the new ones.
There is a gap where your application is offline. That is the trade-off. The upside is that old and new versions never run at the same time, which matters if they cannot coexist safely.
Best for: development environments, or applications where running two versions simultaneously causes data or API conflicts.
Blue/Green deployment
You run two identical environments. One is live (Blue). One is on standby (Green). You deploy the new version to Green, test it fully, and then switch all traffic over in one cut.
If something goes wrong, you switch back to Blue instantly.
The downside is cost. You are running double the infrastructure during the transition.
Best for: high-stakes releases where you need an instant rollback option.
Canary deployment
You send a small slice of live traffic to the new version. If it holds up, you gradually increase the split until the old version is retired.
It is the most controlled way to release. It also requires the most tooling to do properly.
Best for: teams with monitoring in place who want to test a new release on real users before going all in.
Strategy comparison
| Strategy | Downtime | Versions running simultaneously | Rollback speed | Complexity |
| Rolling update | None | Briefly, during transition | Medium | Low |
| Recreate | Yes | No | Fast | Low |
| Blue/Green | None | Yes (two environments) | Instant | Medium |
| Canary | None | Yes (controlled split) | Medium | High |
Key capabilities
Here are the key capabilities of Kubernetes.
Self-healing
If a container crashes or a node fails, Kubernetes replaces the affected pod automatically. Your application keeps running.
Scaling
You can scale your application up or down with a single command. Kubernetes spreads the pods across available nodes.
Zero-downtime updates
With Rolling Update, you can push a new version of your application without taking it offline. Users do not notice anything.
Rollbacks
If a new deployment breaks something, you can undo it immediately. Kubernetes stores a history of previous versions and can revert to any of them on command.
Essential kubectl commands
These are the commands you will use most once your cluster is running.
Apply a deployment from a YAML file:
kubectl apply -f deployment.yamlCheck the status of a rollout:
Check the status of a rollout:Scale replicas up or down:
kubectl scale deployment/web-app-deployment --replicas=5Roll back to the previous version:
kubectl rollout undo deployment/web-app-deploymentList all pods and their status:
kubectl get podsGet detailed info on a deployment:
kubectl describe deployment web-app-deploymentThe problem with self-managing Kubernetes
Running a Kubernetes cluster yourself is not just about deploying applications. Someone has to keep the control plane running.
The control plane is the brain of the cluster. It handles the API server, the scheduler, etcd (where cluster state is stored), and the controller manager. Keeping it healthy, backed up, and updated is a full-time responsibility.
Add to that: node upgrades, networking, certificate rotation, monitoring, and incident response. For most teams, this work costs more time than the infrastructure is worth.
Managed Kubernetes removes that burden. The cloud provider runs the control plane. You handle your workloads.
For Indian businesses, three more reasons make managed Kubernetes on CloudPe the practical choice:
- Data stays in India. Your workloads run in CloudPe’s Mumbai data centres, keeping you aligned with DPDP 2023 and RBI data localisation requirements.
- INR billing. No dollar invoices, no forex exposure, no surprises at month end.
Cluster management is free. CloudPe charges ₹0/hr for cluster management. You pay only for the compute your nodes use.
How to set up Kubernetes on CloudPe
Here is the full setup, step by step, written for someone doing this for the first time.
Before you start
You need four things ready:
- A CloudPe account with an active project
- An SSH key added to your account
- Billing set up (or your free trial active)
- A region in mind (Mumbai DC2 is the standard choice for India-based workloads)
CloudPe offers a 15-day free trial with no credit card required. That is enough time to spin up a cluster, run real workloads, and decide if the platform works for you.
Start free trial
Once you are in:
- Go to Billing and Account > Projects and create a project
- Go to Billing and Account > SSH Keys and add or generate an SSH key
Step 1: Navigate to Kubernetes
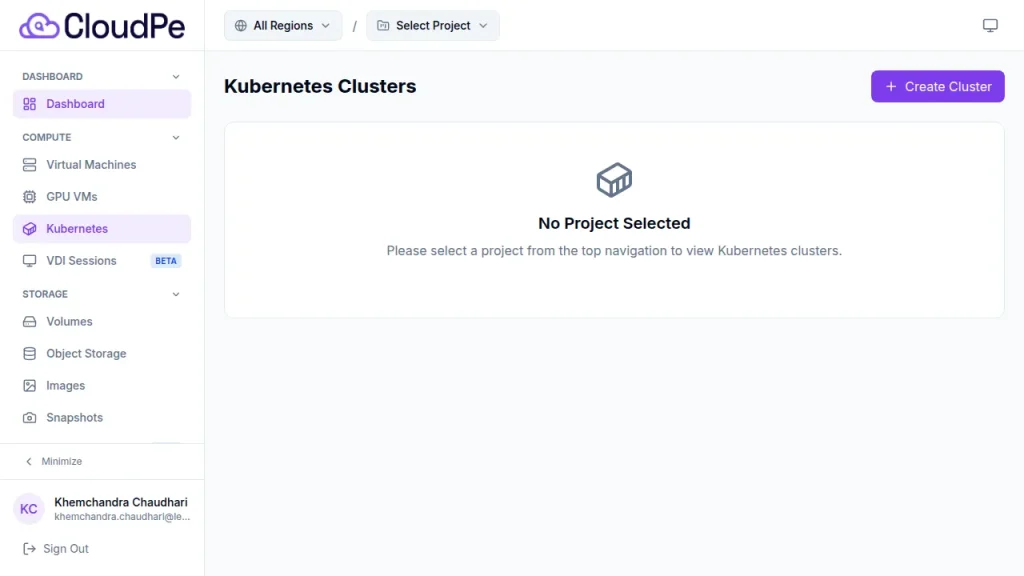
From the CloudPe dashboard, expand Compute in the left sidebar. Click Kubernetes.
You land on the Kubernetes Clusters list. If this is your first cluster, the page will be empty.
Click + Create Cluster in the top-right corner.
Step 2: Name your cluster and pick a region
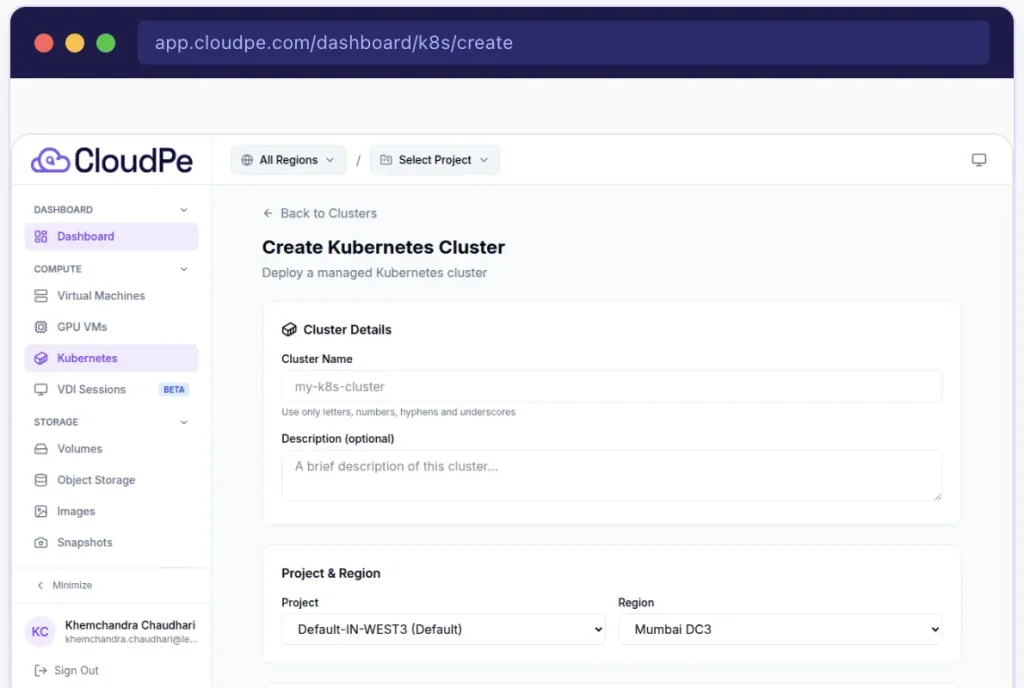
The form opens as one long scrollable page.
Fill in the top section:
- Cluster Name — keep it descriptive. Examples: prod-cluster, staging-k8s, dev-west-1. Use lowercase letters, numbers, and hyphens only.
- Description (optional) — a short note on what this cluster is for. Helpful when you have more than one.
- Project — select the project this cluster belongs to.
- Region — select Mumbai DC2 Zone A (IN-WEST2) for India-based workloads. You cannot move a cluster to a different region after creation.
Step 3: Select a Kubernetes version
CloudPe shows version options as selectable cards. Each represents a specific Kubernetes version set up for different use cases.
Click the card that fits your workload. The selected card gets a purple border.
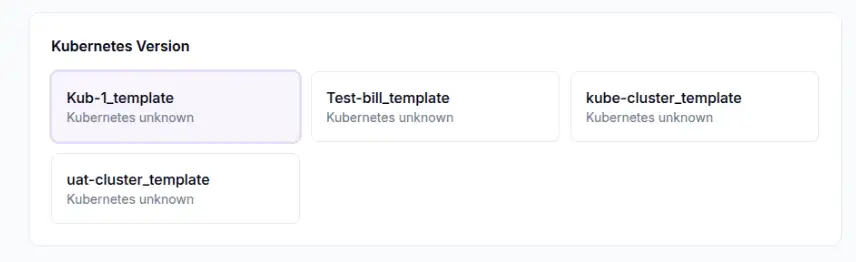
If you are not sure, pick the most recent stable version.
Step 4: Configure the control plane
This section sets up the master nodes that run your cluster.
High Availability (HA)
Enabling HA deploys 3 master nodes behind a load balancer. This removes the single point of failure on the control plane.
- Turn on HA for production.
- Leave it off for development and testing.
Master flavor
Choose the compute size for your master nodes. The minimum is 2 vCPU and 4 GB RAM.
| Flavor | Specs | Use case |
| a.cpu1.4g | 2 vCPU, 4 GB RAM | Development and small clusters |
| a.cpu1.8g | 4 vCPU, 8 GB RAM | Medium production clusters |
| a.cpu1.16g | 8 vCPU, 16 GB RAM | Large production clusters |
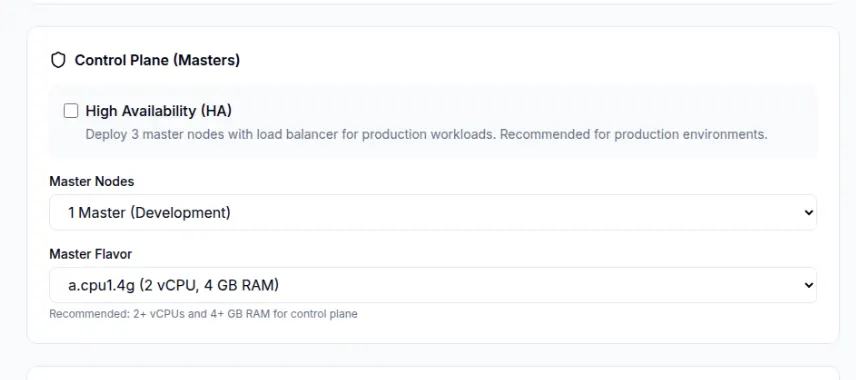
For a first cluster or a staging setup, a.cpu1.4g is fine.
Step 5: Configure worker nodes
Worker nodes are where your application pods actually run.
Set three things:
- Worker node count — start with 2. You can add more later from the cluster detail page without disrupting running workloads.
- Worker flavor — match this to your expected pod count and memory needs.
- Docker volume size — the local storage per node for container images and runtime data. Default is 50 GB. Increase it if your images are large.
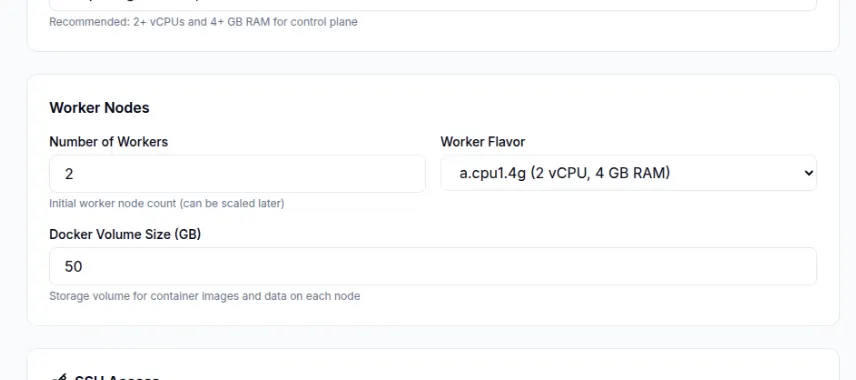
Start small. CloudPe lets you scale up from the dashboard as your workloads grow.
Step 6: Add your SSH key and review pricing
Pick an SSH key from the dropdown. It will be injected into all nodes so you can SSH in when needed. If you do not have one yet, click Generate to create a new key pair.
Before you hit Create, check the Pricing Estimate at the bottom of the page:
| Resource | Cost |
| Cluster management fee | ₹0.00/hr |
| Master node (1x, 2 vCPU / 4 GB) | ₹0.75/hr |
| Worker nodes (2x, 2 vCPU / 4 GB each) | ₹1.49/hr |
You pay for compute only. Cluster management is free.
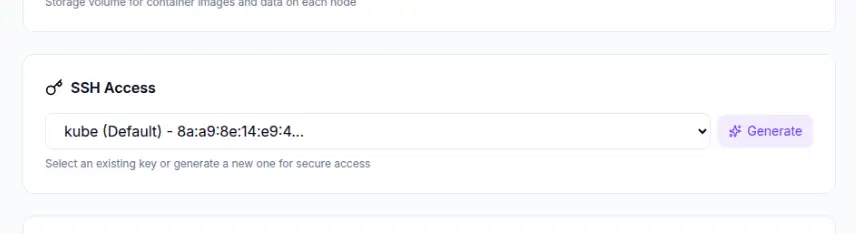
Confirm your configuration looks right and click Create Kubernetes Cluster.
Step 7: Wait for provisioning
CloudPe will:
- Provision and configure the master node (API server, etcd, scheduler)
- Provision worker nodes and connect them to the cluster
- Set up networking (CNI plugin) and storage integrations
- Make the cluster available via the cluster detail page
This takes 10 to 15 minutes. Watch progress on the cluster detail page.
Step 8: Connect kubectl and run your first deployment
Once the cluster is ready:
1. Download the kubeconfig file from the cluster detail page.
2. Set it as your active config:
export KUBECONFIG=~/Downloads/your-cluster-kubeconfig.yaml3. Check your connection:
kubectl get nodesYou should see your master and worker nodes with a Ready status.
4. Run your first deployment using the YAML structure from earlier in this article:
kubectl apply -f deployment.yaml
kubectl rollout status deployment/web-app-deployment
kubectl get pods
Your application is now running on CloudPe’s managed Kubernetes infrastructure in India.
Kubernetes deployment best practices
A few rules that prevent the most common mistakes:
- Always use HA in production: A single-master cluster goes offline if that one master fails. HA is cheap insurance.
- Start small, scale from the dashboard: You do not need to provision everything upfront. Add worker nodes as demand grows.
- Use Rolling Update as your default: It is zero downtime, low complexity, and works for most production scenarios. Only switch strategies when you have a specific reason.
- Set resource requests and limits on every pod: Without them, one badly behaved pod can starve everything else on the same node.
- Never tag production images as: latest: Use version numbers. It makes rollbacks reliable and keeps your deployments auditable.
- Confirm rollout status before moving on: kubectl rollout status tells you the deployment actually completed. Do not assume success because the command ran.
For questions on configuration, migration, or enterprise setup, contact the CloudPe team.
Frequently Asked Questions
What is a deployment in Kubernetes?
A Kubernetes Deployment is a declarative object that manages the lifecycle of your application. You define the desired state: which container image to run, how many replicas, and how to handle updates. Kubernetes works continuously to match that state.
What is the difference between a Pod and a Deployment?V
A Pod runs a single instance of your application. A Deployment manages a group of identical Pods, keeps the right number running, and handles updates and rollbacks. In production, you almost never create Pods directly.
Which deployment strategy has zero downtime?
Rolling Update, Blue/Green, and Canary deployments all achieve zero downtime. Rolling Update is the default and the simplest to operate. Blue/Green and Canary give you more control but require more tooling.
What is the difference between Blue/Green and Canary deployments?
Blue/Green switches all traffic from the old version to the new version in one cut. Canary sends a small percentage of traffic to the new version first, then increases the split gradually after validation.
How long does Kubernetes cluster setup take on CloudPe?
Filling the creation form takes about 5 minutes. Provisioning takes 10 to 15 minutes. You can have a fully running cluster in under 20 minutes.
Can I scale worker nodes after the cluster is created?
Yes. Add or remove worker nodes from the cluster detail page at any time. Running workloads reschedule automatically with no disruption.
Is the cluster management fee really free on CloudPe?
Yes. CloudPe charges ₹0.00/hr for cluster management. You pay only for the compute resources of your master and worker node VMs at the standard hourly rate.
Do I manage the Kubernetes control plane myself on CloudPe?
No. CloudPe manages the control plane. You manage your workloads. Provisioning, configuration, and availability of the master nodes are all handled for you.