
Using Acronis Cyber Protect Recovery Media on CloudPe / VHI
━━━━━━━━━━━━━━━━━━━━━━━━━━━━━━━━━━
Purpose: restore a complete Linux system disk, including boot information and all required partitions, to a new CloudPe VM and validate that the recovered server is bootable and operational.
| SECURITY: SecurityScreenshots in this document are for process reference only. Registration tokens and session credentials must never be stored in tickets, KB articles, or shared documentation. The token visible in the source screenshot has been redacted. |
Contents
1. Overview and Scope
2. Prerequisites and Safety Checks
3. BMR Workflow Summary
4. Steps To Download Acronis Bootable Media
5. Bare Metal Recovery Procedure
6. Post-Recovery Linux Validation
7. Boot and Network Troubleshooting
1. Overview and Scope
This SOP describes the Bare Metal Recovery (BMR) procedure for restoring a Linux VM backup to a CloudPe/VHI virtual machine using Acronis Cyber Protect Recovery Bootable Media.
A complete BMR restores the system disk structure required for boot, not only an individual filesystem. The recovery should include the boot/partition metadata presented by Acronis, the complete system disk, and all required Linux partitions.
| GUIDANCE: BMR vs. volume recoveryFor the final production migration, use a complete-disk BMR. Restoring partitions one by one is a troubleshooting/test method used to isolate a problematic filesystem or volume; it is not the preferred final migration method. |
Supported use case
- Source: Linux VM protected by Acronis Cyber Protect.
- Destination: Newly created CloudPe/VHI VM.
- Recovery method: Acronis Recovery Bootable Media in Rescue Mode.
- Typical migration source: KVM, Hyper-V, or another virtualized Linux environment.
2. Prerequisites and Safety Checks
- Confirm migration approval/payment from the Sales Team or ticket notes, where applicable.
- Confirm which Acronis account contains the required backup.
- Verify the latest backup completed successfully and contains all required disks/volumes.
- Create a destination VM with the required vCPU, RAM, network, and storage.
- Destination disk capacity must be equal to or larger than the source disk being recovered.
- Match the source boot mode (UEFI or Legacy BIOS) on the destination wherever possible.
- Ensure console/noVNC access to the destination VM before starting the restore.
- Do not run the original production VM and the restored VM simultaneously with the same IP address.
| WARNING: Destructive operationBare Metal Recovery overwrites the selected destination disk. Verify the target VM and disk mapping carefully before clicking OK to start recovery. |
Recommended pre-checks on the source Linux VM
| [ -d /sys/firmware/efi ] && echo “UEFI” || echo “Legacy BIOS” lsblk -f df -hT ip addr ip route |
3. BMR Workflow Summary
| Stage | Action | Expected Result | Evidence |
|---|---|---|---|
| 1 | Prepare VM | Destination VM is available with correct resources and boot mode. | VM configuration |
| 2 | Enter Rescue Mode | VM boots from Acronis Recovery Media. | Console screenshot |
| 3 | Register media | Recovery Media can access the correct Acronis tenant. | Registered media status |
| 4 | Select backup | Correct recovery point and complete disk are selected. | Backup/date/disk selection |
| 5 | Map destination | Source disk is mapped to the intended CloudPe disk. | Recovery configuration |
| 6 | Run BMR | Recovery completes successfully without critical errors. | Recovery task result |
| 7 | Boot restored OS | VM boots from the recovered disk. | Console / SSH |
| 8 | Validate services | Filesystems, network and application services work. | Validation output |
4. Steps To Download Acronis Bootable Media
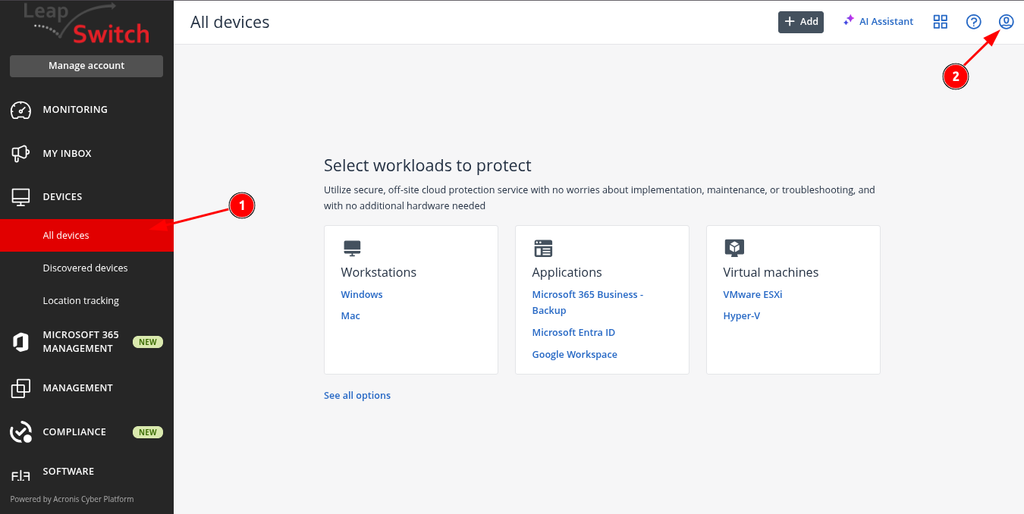
- Login in to the Acronis Web UI.
- Click on the all devices in the Left side panel
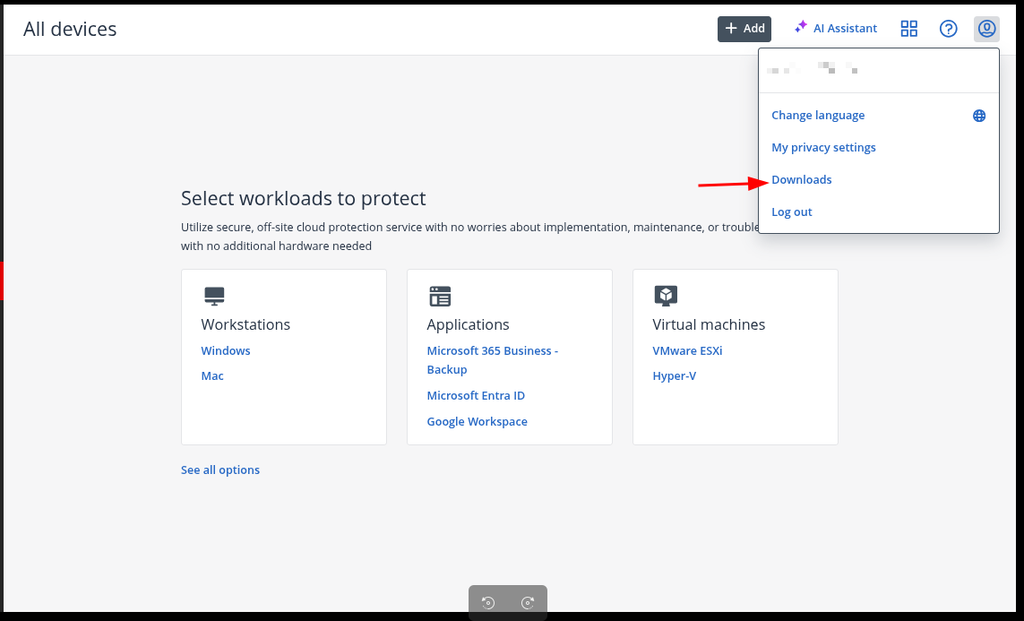
- Click on the User Profile Icon in the top right corner
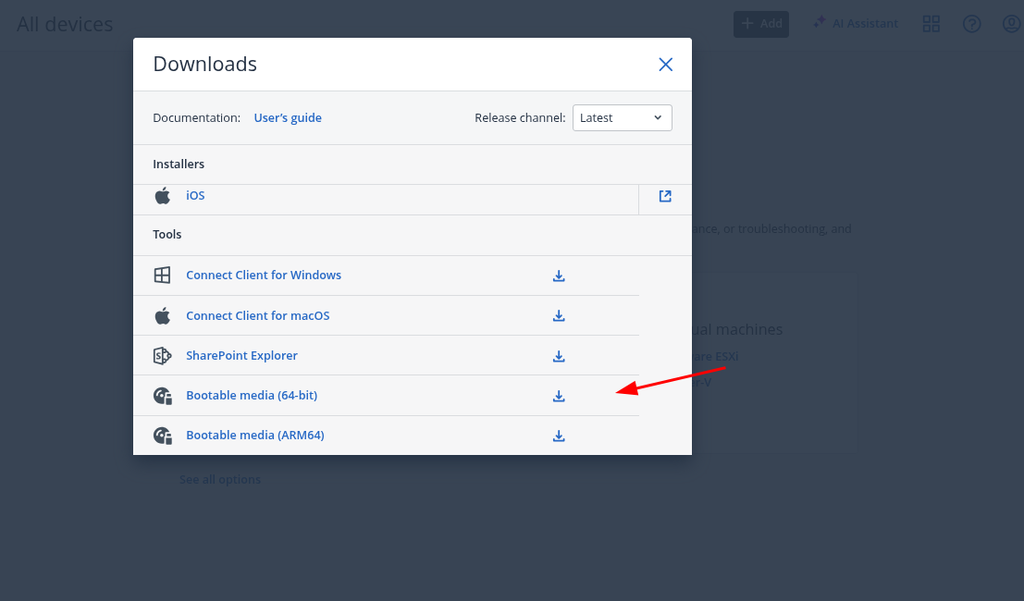
- Select the Download option > Bootable
- It will start downloading the Bootable Media
5. Bare Metal Recovery Procedure
5.1 Create and prepare the destination CloudPe VM
- Create a new VM on CloudPe/VHI using the required Linux-compatible template and matching boot mode.
- Assign the required vCPU, RAM and network.
- Create a disk equal to or larger than the source disk. For example, a 500 GB source disk requires a destination disk of at least 500 GB.
- Confirm console/noVNC access. The temporary template installation will be overwritten during BMR.
5.2 Enter Rescue Mode and start Acronis Recovery Media
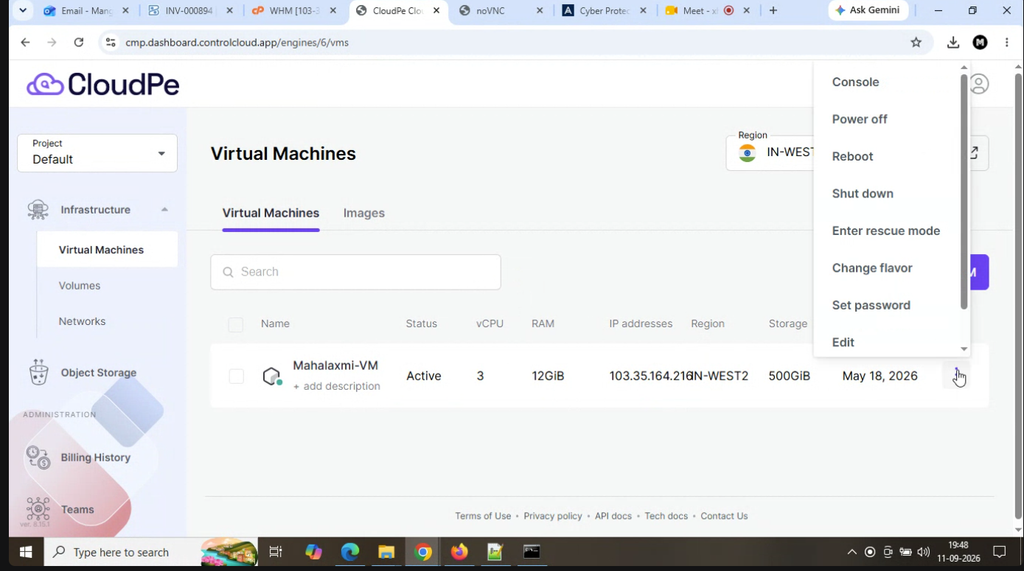
- Open the destination VM in the VHI/CloudPe platform.
- Enter Rescue Mode and select the Acronis Recovery ISO.
- Open the console after the VM reboots.
- On the Acronis boot menu, select Rescue Media. Do not select Continue OS booting.
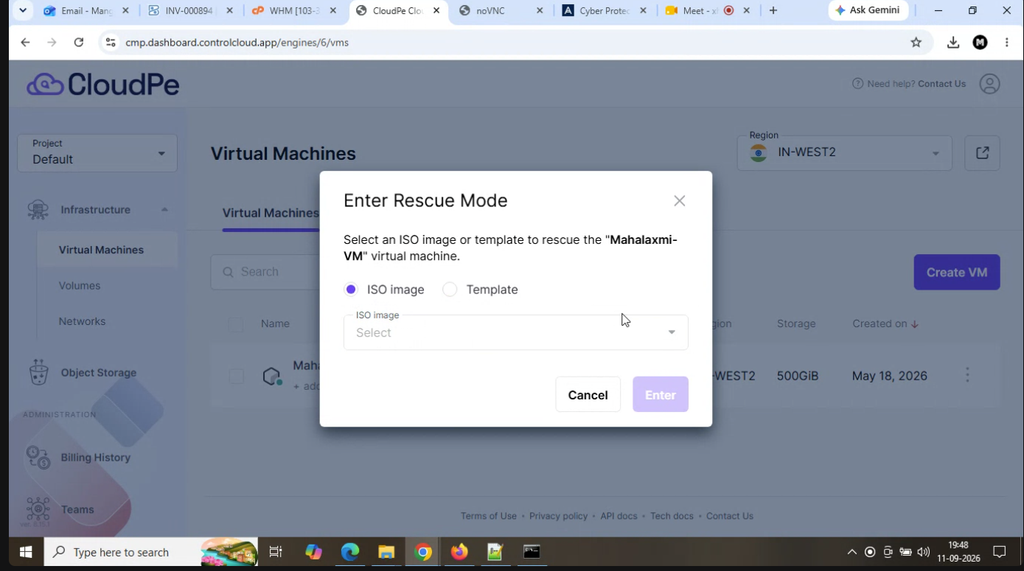
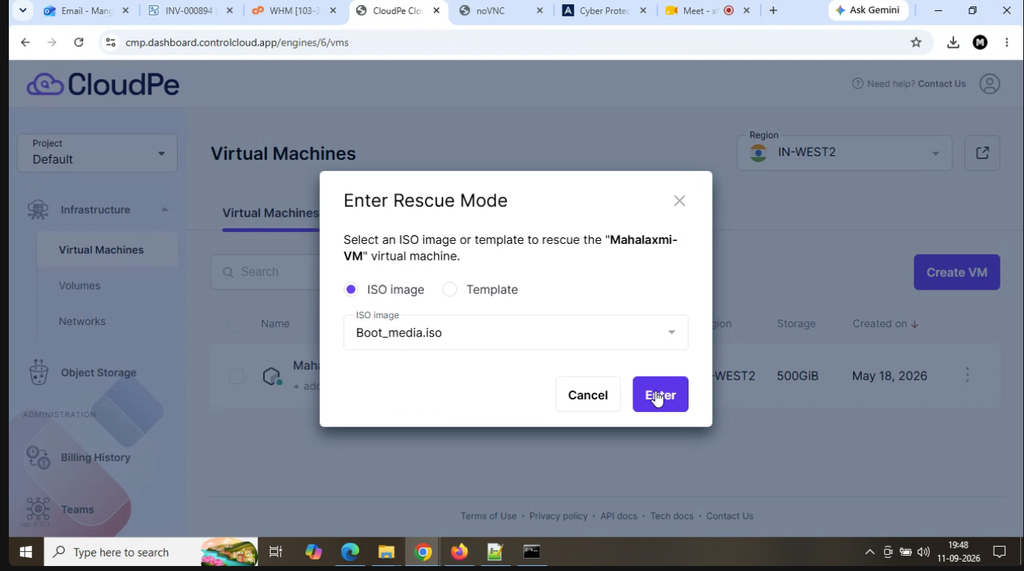
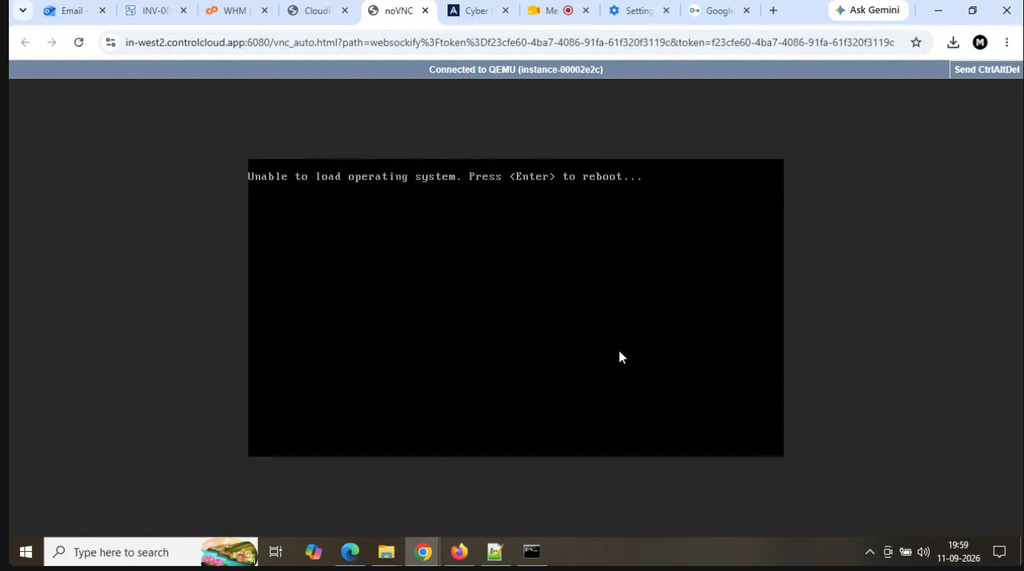
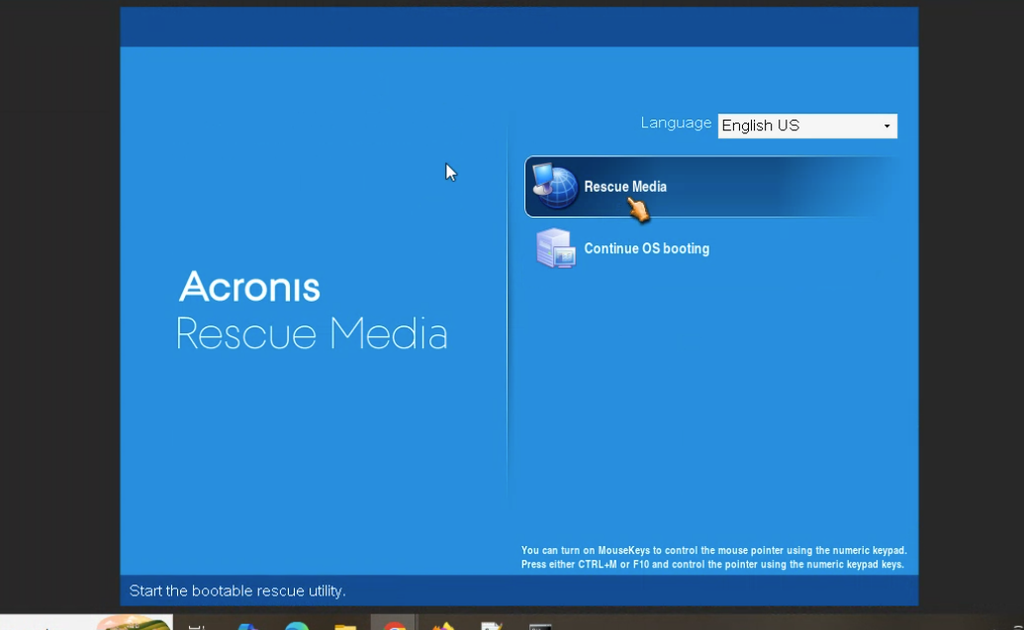
5.3 Verify the Bootable Backup Agent and network connectivity
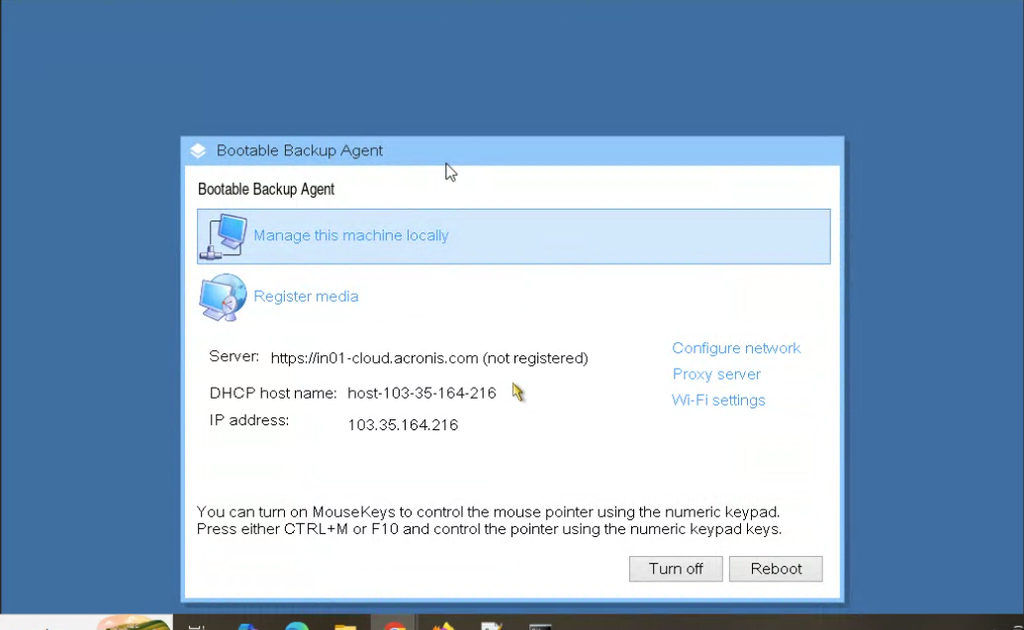
After Acronis loads, confirm that the Bootable Backup Agent has detected a usable IP address. If no address is available, use Configure network and enter the required network settings before proceeding.
5.4 Generate a registration token in Acronis
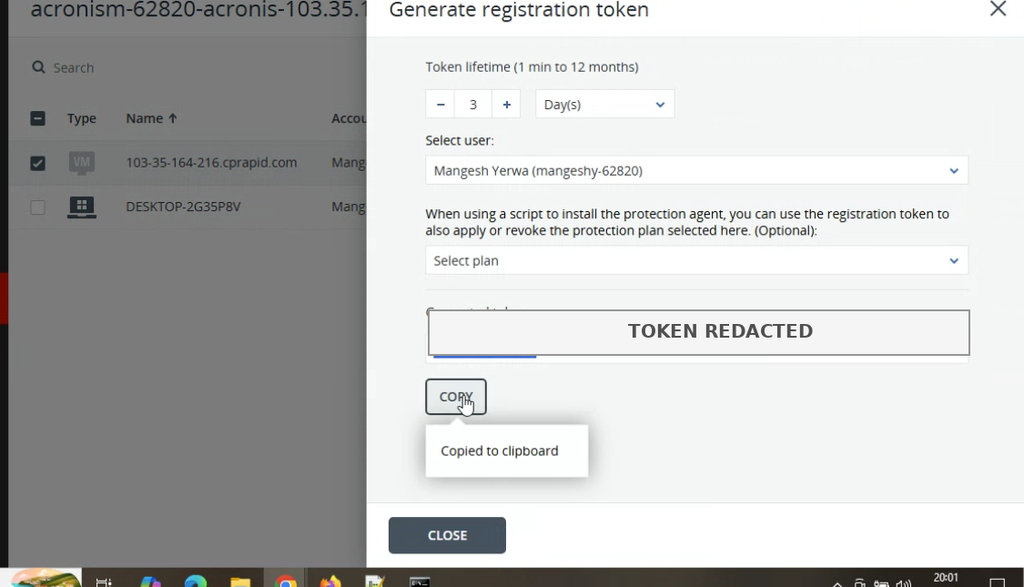
- Log in to the correct Acronis Cyber Protect portal/tenant.
- Generate a registration token for the required user/account.
- Use only the minimum practical token lifetime for the activity.
- Copy the token and keep it confidential.
5.5 Register the Recovery Media
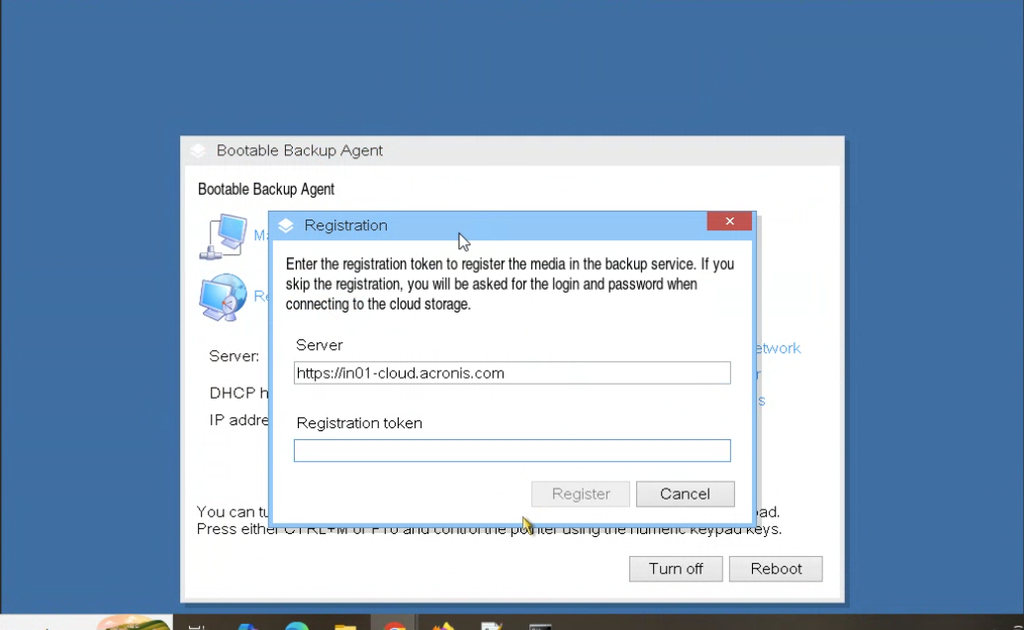
- Return to the Acronis Bootable Backup Agent.
- Click Register media.
- Verify the Acronis service URL.
- Paste the registration token and click Register.
5.6 Open the recovery wizard
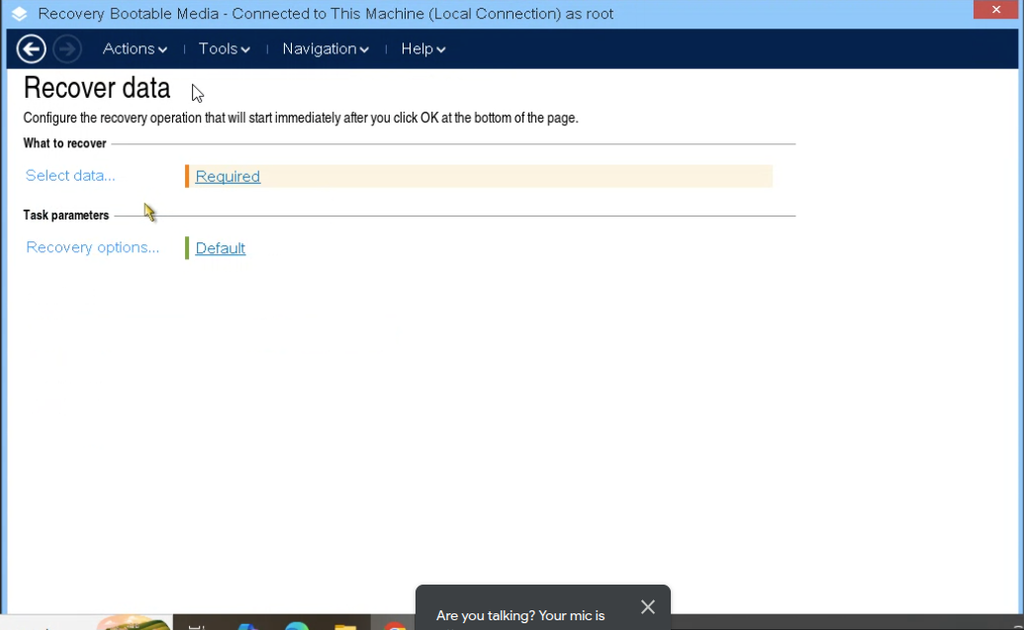
After successful registration, select Manage this machine locally, choose Recover, and open the Recover data screen. Under What to recover, click Required / Select data.
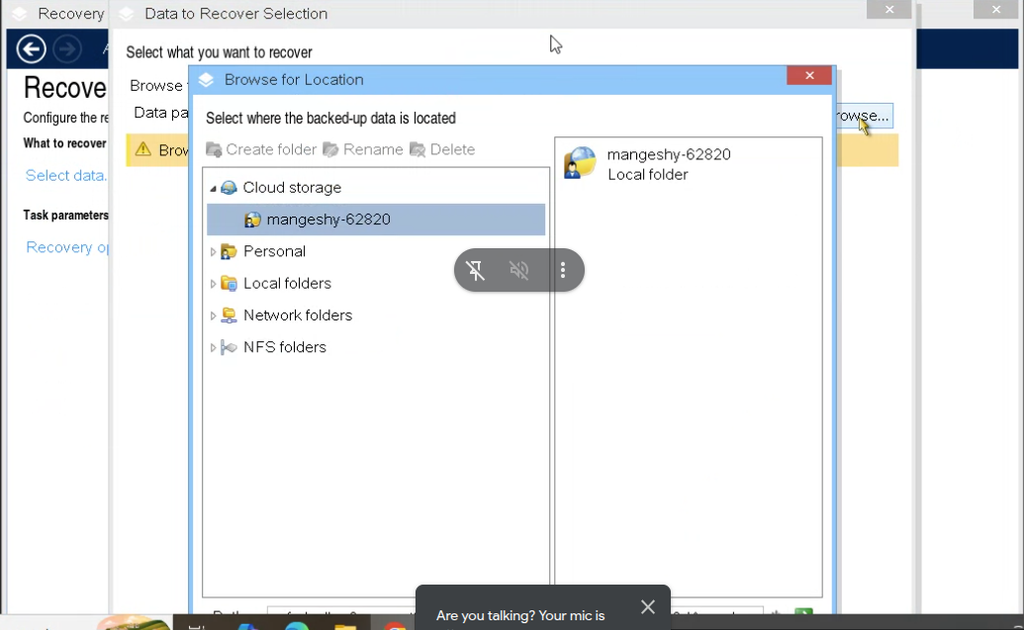
5.7 Browse the Cloud Storage location
- Click Browse.
- Select Cloud storage.
- Select the correct Acronis account/customer folder.
- Click OK to load the available archives and recovery points.
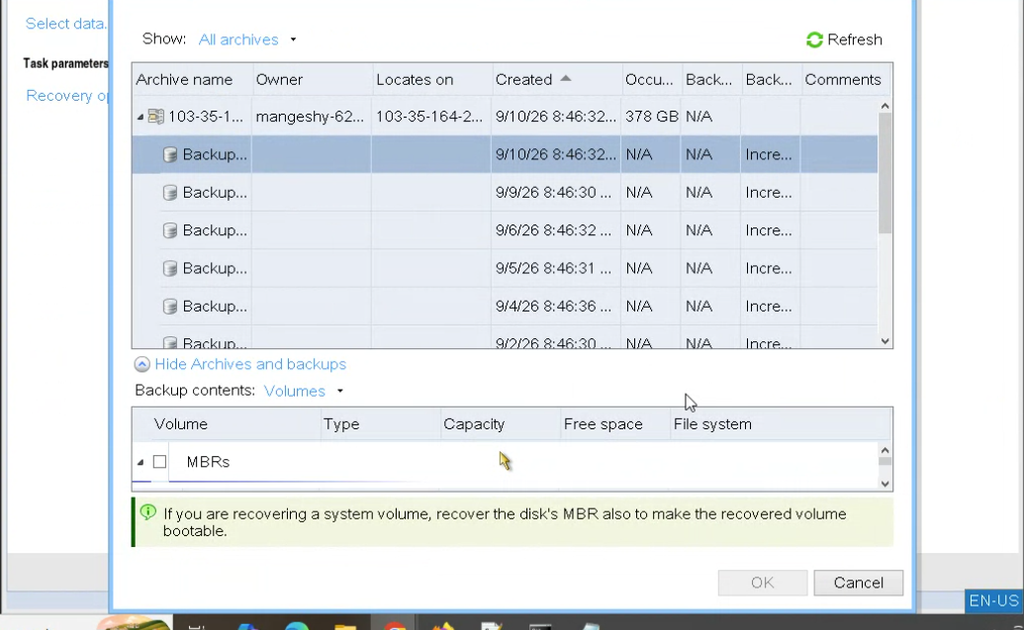
5.8 Select the required recovery point
Select the required backup archive and recovery point. For a production migration, use the latest successful backup unless the customer or change plan specifies a different restore point.
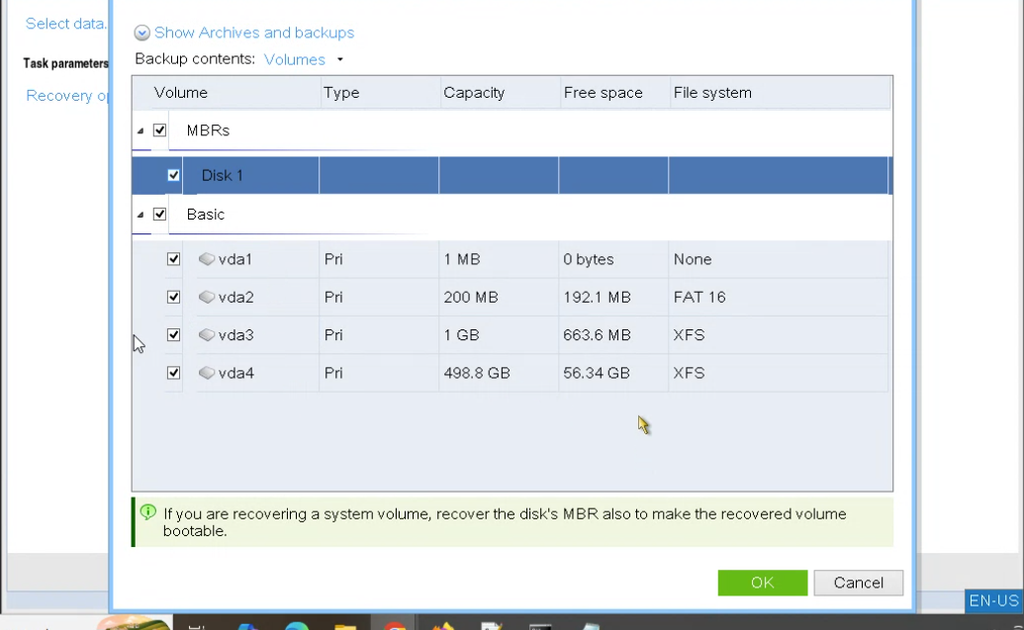
5.9 Select the complete disk for BMR
For Bare Metal Recovery, select the complete system disk and every partition required to boot and operate the Linux server. Also select the boot/partition metadata shown by Acronis as “MBRs”.
| Select: [✓] MBRs / boot information [✓] Disk 1 [✓] vda1 [✓] vda2 [✓] vda3 [✓] vda4 |
| IMPORTANT: ImportantDo not select only the root filesystem for the final BMR. A root-only restore is a volume recovery and may not recreate a bootable system disk. |
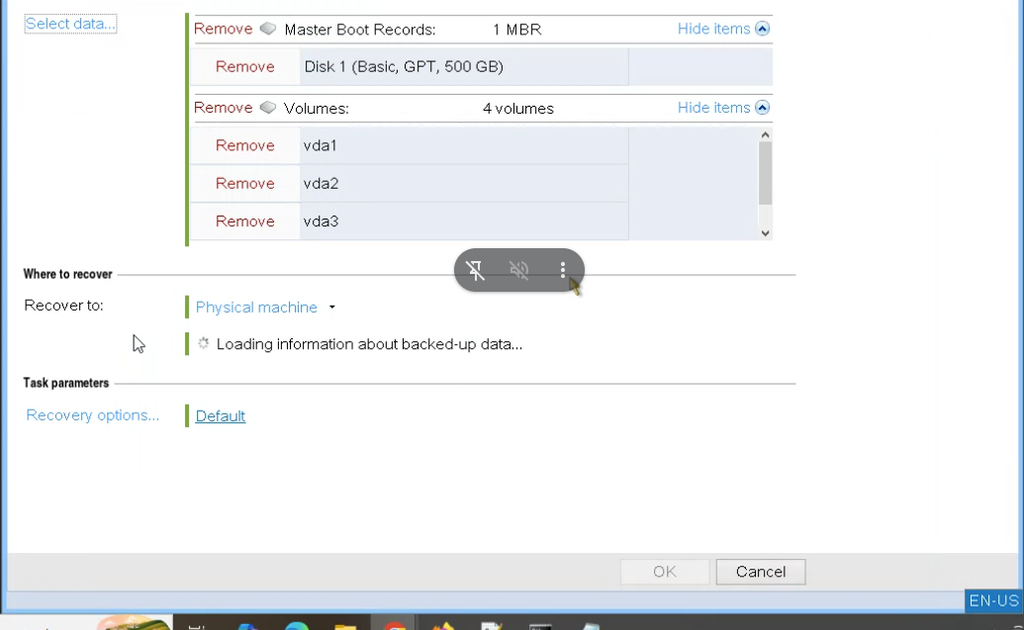
5.10 Confirm the recovery target and disk mapping
Set Recover to as Physical machine and allow Acronis to detect the destination disk. Confirm that the source disk is mapped to the intended CloudPe disk. If multiple disks are attached, verify each mapping carefully before starting the task.
5.11 Start the BMR task
- Review all selected source partitions and destination mappings.
- Click OK to create and start the recovery task.
- Do not stop or reboot the destination VM while recovery is running.
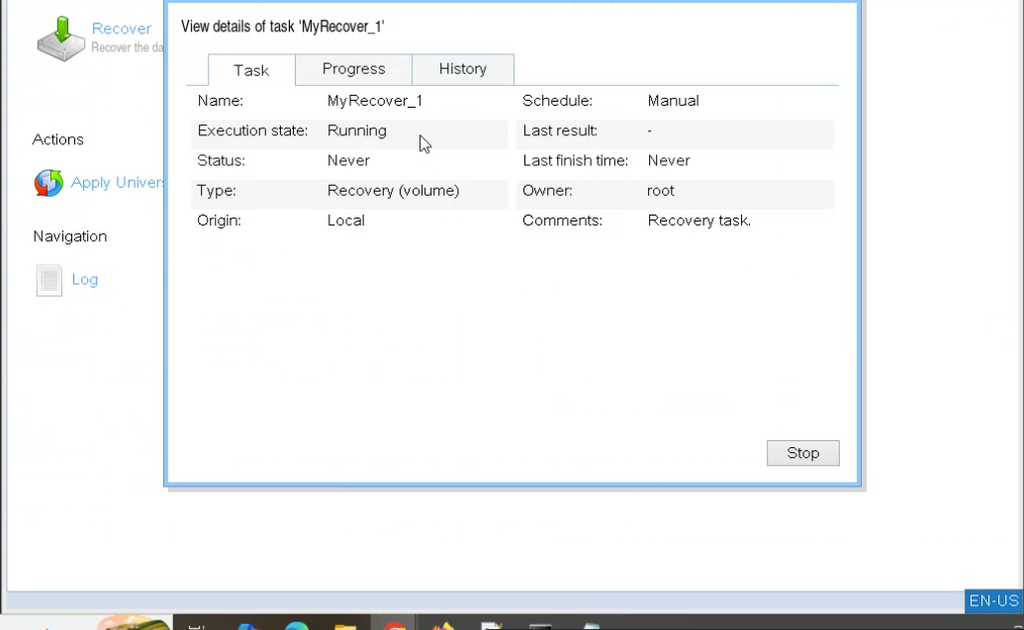
5.12 Monitor recovery progress
Open the Progress tab and monitor the task until it reaches 100%. If Acronis reports an error, capture the full error message and recovery log before retrying.
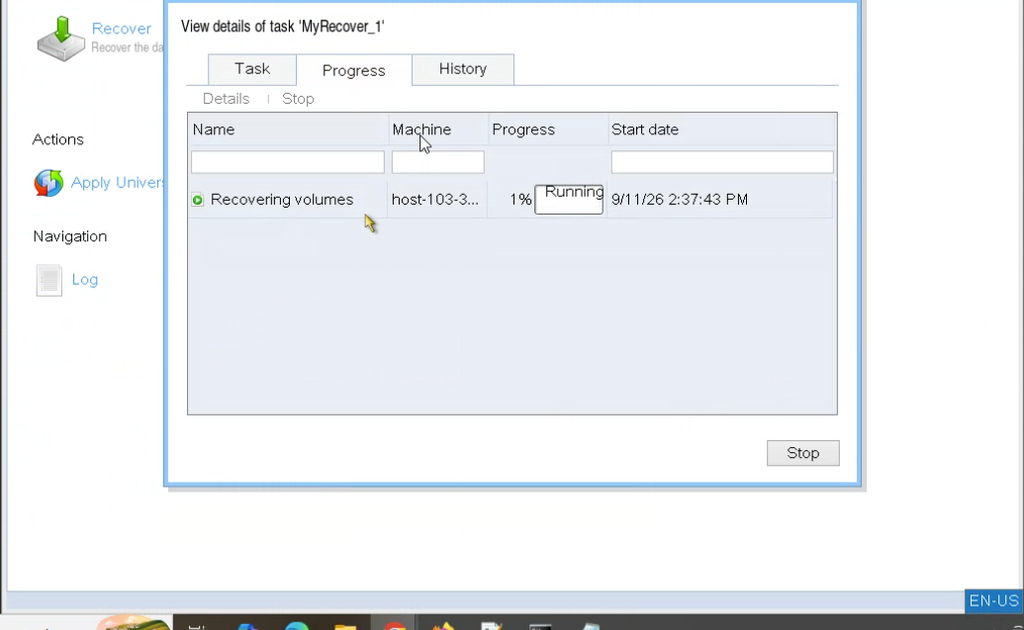
5.13 Exit Rescue Mode and boot from the restored disk
- Confirm that the Acronis recovery task completed successfully.
- Exit Acronis Recovery Media.
- Exit Rescue Mode / detach the recovery ISO as required by the platform.
- Ensure the recovered disk is first in the boot order.
- Reboot the VM and monitor the first boot from the console.
6. Post-Recovery Linux Validation
A successful Acronis task does not by itself complete the migration. Validate the operating system, filesystems, networking and required application services before declaring the recovery successful.
6.1 OS and disk validation
| hostnamectl uname -r lsblk -f df -hT |
6.2 Network validation
| ip addr ip route ip link nmcli device status # if NetworkManager is installed nmcli connection show # if NetworkManager is installed |
6.3 Service and boot validation
| systemctl –failed systemctl is-system-running journalctl -b -p err ss -lntup |
Validate all server-specific services, including web server, database, control panel, mail, cron jobs, mounted data volumes and application processes where applicable.
7. Boot and Network Troubleshooting
After the BMR restoration is completed, restart the VM and check whether Linux boots normally.
If the VM shows Emergency Mode, BusyBox/initramfs, GRUB error, disk not detected, or network issue, follow the troubleshooting steps in this section.
| CAUTION: Change controlOnly modify GRUB, initramfs, /etc/fstab, LVM or network configuration when the observed boot failure clearly points to that component. Capture the original state before making changes. |
7.1 Disk or filesystem not detected
| lsblk blkid |
7.2 LVM volumes not active
| pvs vgs lvs vgscan vgchange -ay |
7.3 Emergency mode caused by filesystem/UUID mismatch
| blkid cat /etc/fstab |
Compare the UUIDs/device references and correct only entries confirmed to be invalid. Do not modify fstab based on assumption.
7.4 Rebuild initramfs when VirtIO storage drivers are missing
For RHEL/CentOS/AlmaLinux/Rocky Linux, after mounting and chrooting into the restored system:
| dracut -f # If required: dracut –force –add-drivers “virtio_pci virtio_blk virtio_scsi virtio_net” |
For Ubuntu/Debian:
| update-initramfs -u -k all update-grub |
7.5 Network interface name changed after migration
The source server may use a different interface name than the CloudPe VM (for example, eth0 on the source and ens3 on the destination). Check the detected interface and update only the relevant network configuration.
| ip link ip addr ip route nmcli device status nmcli connection show |
8. SystemRescue Recovery: Repair Pseudo-Filesystems and Rebuild GRUB
Use this procedure after Acronis Bare Metal Recovery when the restored Linux VM does not boot normally, or when SystemRescue cannot see the expected disks because /sys, /dev, or /proc is unavailable. For AlmaLinux/RHEL-based systems, this section also covers rebuilding GRUB from the restored operating system.
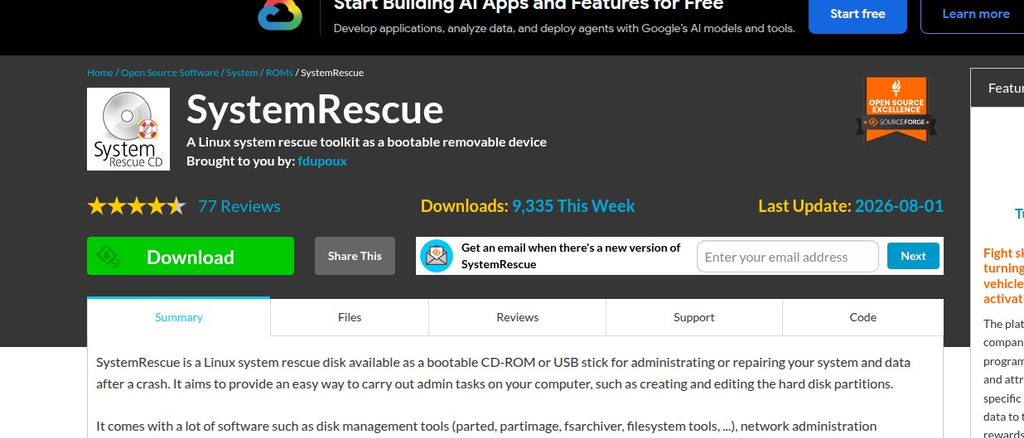
SystemRescue download: https://sourceforge.net/projects/systemrescuecd/
| CloudPe boot procedure: Upload the SystemRescue ISO to CloudPe, attach it to the affected VM, set CD/ISO as the first boot device, and hard-reboot the instance. |
| Important: The device names shown in the screenshots are from the captured recovery case. Always confirm the actual root, /boot, and EFI partitions with lsblk -f and blkid before running mount, GRUB, or filesystem commands. |
8.1 If SystemRescue cannot see the disk devices
If lsblk fails with “failed to access sysfs directory: /sys/dev/block: No such file or directory”, or a known partition reports “special device … does not exist”, restore the live rescue environment pseudo-filesystems first.
| mount -t proc proc /proc mount -t sysfs sysfs /sys mount -t devtmpfs devtmpfs /dev lsblk -f blkid |
Continue only after the expected disk and partition nodes are visible. If reboot returns “Running in chroot, ignoring request”, exit the chroot session until you are back at the live SystemRescue shell.
8.2 Advanced SystemRescue Boot Repair After BMR
Use the following workflow when the Acronis restore completes but the VM still drops to BusyBox/initramfs, fails to mount the restored root filesystem, or boots using an incorrect template GRUB/kernel configuration.
| Core repair principle: Do not rely on the temporary CloudPe template boot partition. The repaired VM must boot using the restored operating system’s own kernel, initrd, GRUB configuration, and the correct UUID of the restored root filesystem. |
8.7.1 Identify the restored partitions and UUIDs
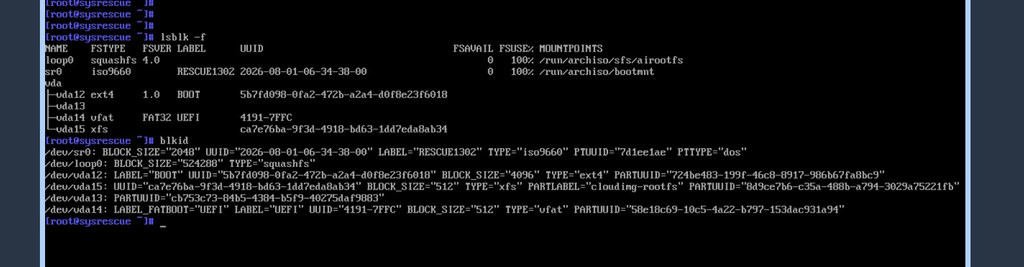
Boot into SystemRescue and identify the root, /boot, and EFI System Partition.
| lsblk -f blkid |
In the captured case, the restored layout was /dev/vda15 = XFS root filesystem, /dev/vda12 = ext4 /boot, and /dev/vda14 = vfat EFI. Treat this only as an example and verify the affected VM independently.
8.7.2 Mount the restored system, bind the live filesystems, and enter chroot
Example commands used in the captured recovery case:
| mkdir -p /mnt/root mount /dev/vda15 /mnt/root mount /dev/vda12 /mnt/root/boot mount /dev/vda14 /mnt/root/boot/efi mount –bind /dev /mnt/root/dev mount –bind /proc /mnt/root/proc mount –bind /sys /mnt/root/sys chroot /mnt/root /bin/bash |
Locate any stale root filesystem label or UUID references in the restored GRUB configuration.
| grep -rl ‘cloudimg-rootfs’ /etc/default/grub /etc/default/grub.d /boot/grub/grub.cfg 2>/dev/null |

Figure 13 – Mounting the restored system, binding /dev, /proc and /sys, entering chroot, and locating the GRUB reference.
8.7.3 Correct the root filesystem reference and verify /etc/fstab
If GRUB references a filesystem LABEL that does not match the actual restored filesystem, replace the confirmed bad label with the UUID reported by blkid. Back up the configuration file before editing.
| cp -a /boot/grub/grub.cfg /boot/grub/grub.cfg.bak sed -i ‘s/LABEL=<old-label>/UUID=<correct-uuid>/g’ /boot/grub/grub.cfg grep -n ‘<correct-uuid>’ /boot/grub/grub.cfg cat /etc/fstab blkid |
The captured case replaced LABEL=cloudimg-rootfs with the UUID of /dev/vda15 and verified that /etc/fstab also referenced the same root UUID.
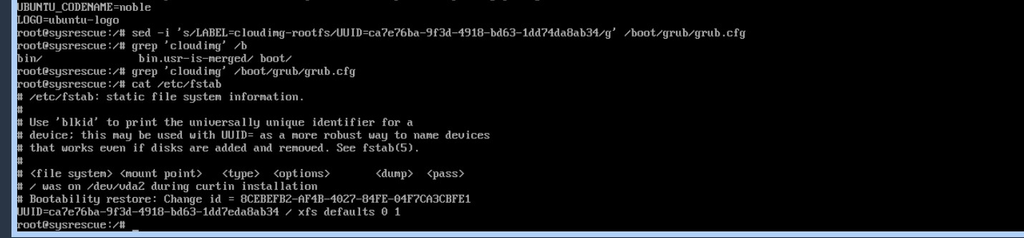
Figure 14 – Replacing the stale LABEL reference with the restored root UUID and verifying /etc/fstab.
8.7.4 If the VM still drops to BusyBox/initramfs, verify what the kernel received
Reboot once to test the corrected UUID. If the VM still drops to initramfs, collect the following:
| cat /proc/cmdline blkid ls /root mount |
Confirm that the expected root UUID is present in the kernel command line. If /root is empty and the restored filesystem is not mounted, continue with the driver and kernel checks below.
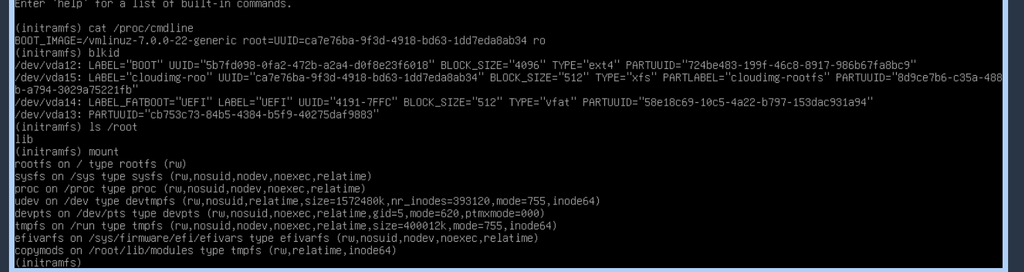
Figure 15 – initramfs diagnostics showing the root UUID passed on the kernel command line, detected partitions, and mount state.
8.7.5 Verify filesystem driver availability in the initramfs
Check the booted kernel version, available module tree, and whether the required filesystem driver is present.
| uname -r ls /lib/modules/ cat /proc/filesystems modprobe -v <fstype> find /lib/modules/<kernel-version> -iname ‘*<fstype>*’ |
In the captured case, the boot environment was using kernel 7.0.0-22-generic while the required XFS module was not available in that kernel module tree.
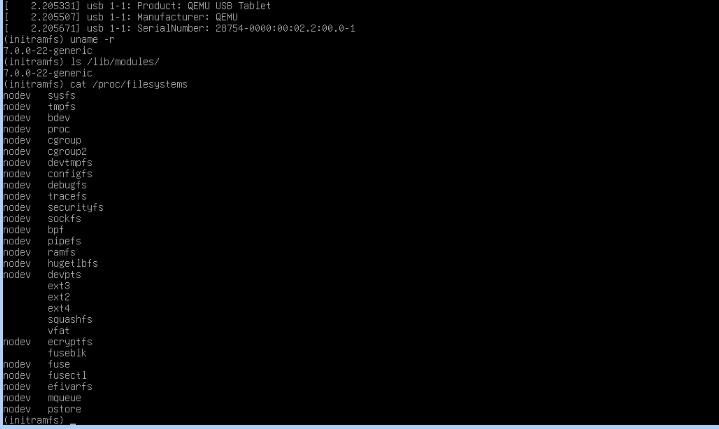
Figure 16 – Checking the initramfs kernel, module directory, and supported filesystem types.
8.7.6 Chroot back into the restored system and rebuild initramfs
Boot back into SystemRescue, mount the restored root and boot partitions, bind the required virtual filesystems, enter chroot, and rebuild the initramfs.
| mount /dev/<root-partition> /mnt mount /dev/<boot-partition> /mnt/boot mount /dev/<efi-partition> /mnt/boot/efi for d in /dev /proc /sys /run; do mount –bind $d /mnt$d; done chroot /mnt /bin/bash update-initramfs -u -k all |
If update-initramfs reports that the expected /lib/modules/<kernel-version> directory does not exist, this confirms a kernel/module mismatch rather than a simple UUID problem.
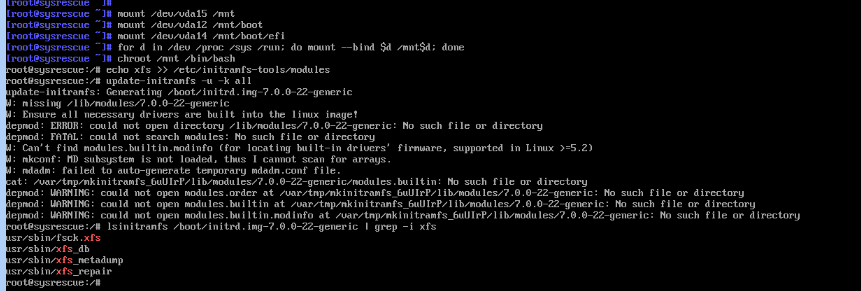
Figure 17 – update-initramfs exposing the missing kernel module directory and XFS/module-related boot-image problem.
8.7.7 Compare the kernel GRUB is trying to boot with the kernels actually installed
| ls /lib/modules/ dpkg -l | grep linux-image grep vmlinuz /boot/grub/grub.cfg |
The kernel referenced by GRUB should have a matching directory under /lib/modules/. If it does not, rebuild GRUB using the restored operating system’s own /boot files.

Figure 18 – Installed kernel packages and /lib/modules contents used to confirm the kernel mismatch.
8.7.8 Expose the restored operating system’s own /boot
Exit the chroot and unmount the template-provided /boot and /boot/efi mounts. This exposes the restored root filesystem’s own kernel and initrd files.
| exit umount /mnt/boot/efi 2>/dev/null || true umount /mnt/boot 2>/dev/null || true ls -la /mnt/boot |
Verify that the restored system’s own vmlinuz and initrd.img files are now visible before reinstalling GRUB.

Figure 19 – Restored system /boot exposed after removing the temporary template boot mounts.
8.7.9 Reinstall the UEFI GRUB bootloader
Mount the actual EFI System Partition and re-enter the restored operating system:
| mkdir -p /mnt/boot/efi mount /dev/<efi-partition> /mnt/boot/efi chroot /mnt /bin/bash grub-install –target=x86_64-efi –efi-directory=/boot/efi –bootloader-id=ubuntu –recheck |
If grub-install reports that the x86_64-efi GRUB module files are missing, restore/install the matching GRUB EFI files before retrying. The captured case initially failed because /usr/lib/grub/x86_64-efi/modinfo.sh was not present.

Figure 20 – Initial UEFI grub-install failure because the required x86_64-efi GRUB module files were missing.
After grub-install completes successfully, regenerate the boot configuration and verify the installed kernel entries:
| update-grub grep vmlinuz /boot/grub/grub.cfg ls /lib/modules/ |
Create the standard fallback UEFI boot path as a safety net:
| mkdir -p /boot/efi/EFI/BOOT cp /boot/efi/EFI/ubuntu/grubx64.efi /boot/efi/EFI/BOOT/BOOTX64.EFI ls -la /boot/efi/EFI/ |
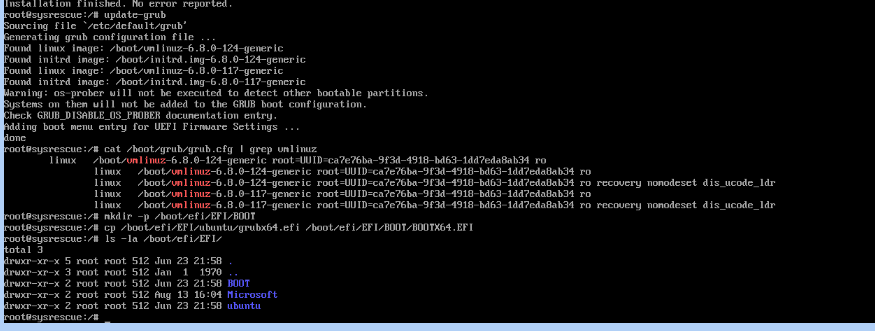
Figure 21 – Successful GRUB regeneration, correct kernel entries, and creation of the fallback EFI/BOOT/BOOTX64.EFI path.
8.7.10 Exit SystemRescue and boot the restored VM from disk
Exit chroot, unmount the recovery mounts, detach the SystemRescue ISO, return boot order to disk first, and hard-reboot the VM.
| exit umount /mnt/boot/efi umount /mnt/dev umount /mnt/proc umount /mnt/sys umount /mnt/run 2>/dev/null || true umount /mnt |
Expected result: the VM boots using the restored operating system’s own kernel/initrd and reaches the normal Linux login prompt.
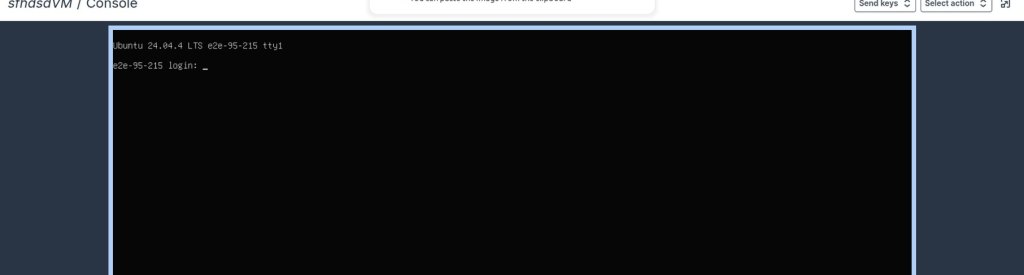
Figure 22 – Restored Ubuntu VM successfully booting to the normal login prompt in the CloudPe console.
8.7.11 Reset the root or another local user password offline (optional)
If the restored VM boots but the required local credentials are unknown, use SystemRescue and chroot to reset the password.
| mount /dev/<root-partition> /mnt mount –bind /dev /mnt/dev mount –bind /proc /mnt/proc mount –bind /sys /mnt/sys chroot /mnt /bin/bash passwd <username> exit umount /mnt/sys umount /mnt/proc umount /mnt/dev umount /mnt |
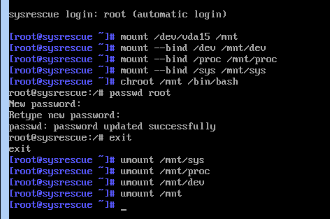
Figure 23 – Offline password reset completed successfully from SystemRescue chroot.
| Final validation: Detach the SystemRescue ISO, set the VM to boot from disk, hard-reboot, and validate login, lsblk -f, df -hT, ip addr, ip route, systemctl –failed, and the required application services before closing the migration. |